“All good things- trout as well as eternal salvation- come
by grace, grace comes by art and art does not come easy.” Norman MacLean
Things being what they are, I think we could all use a little
art, grace and probably a hefty dose of salvation at the moment. With current events as they
are, it’s hard to focus on the words I wanted to accompany this post; words
about artistry, learning, growing, creativity and free-thinking. Words about
taking the opportunity to escape from the norm, an escape from the invisible
boundaries of fly tying, as well as life. In a certain sense it seems frivolous
to be making a post like this, at this particular moment in time, on the other
hand it seems a shame not to.
It pains me to think about some of the things happening in
America over the last few days, weeks and months. I wonder how it looks from
the other side of the Atlantic, the Pacific and all points between. I wonder
what the view is from over there, where ever there is, outside America. I
wonder if we’re starting to look like one of those countries we would rush
into so we could rescue the citizens by removing a dictator from office, ending
the violence and bringing in aide for the health of the country? But that is
NOT what this post is about, it’s about shutting out the noise and getting on
with what makes us who we are as individuals and feeding our souls instead of
our anger.
I have welcomed the distraction, something to challenge an artistic
focus that has been blurred lately. In the words of Agent K, “There's always an
Arquillian Battle Cruiser, or a Korilian Death Ray, or an intergalactic plague
that is about to wipe out all life on this miserable planet. The only way these
people can get on with their happy lives is that they "do not know about
it!" I hope this post provides at least a hint of escape an opportunity to
silence the noise, find an artistic refuge, if only for a few minutes.
When Mike Noffsinger contacted me with a photo and the
message, “A friend asked if this is a possibility.” I jumped on it. Resisting a
challenge is next to impossible for me, especially if it offers the chance to
explore blending a few tying techniques in a new way. I asked permission to
share the original photo but haven’t heard from the poster.
I didn’t intend to do this tutorial post until a Facebook
post got such a great response. So, here it is, recipe, and photos accompanied
by a few words.
Tying Instructions
1- Start the thread near the eye and lay a single layer base
back into the bend. Stop at the point even with the barb point and make 3-4
over-lapping wraps.
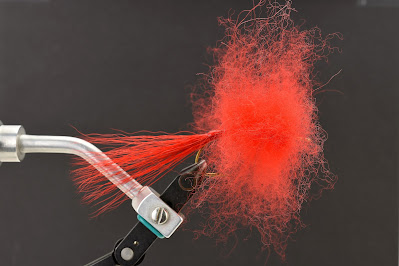
2- Cut the longest hair available from a red, dyed northern
bucktail. Even the tips as much as possible. Remove the hairs of less than 2.5”
from the bundle and re-even the tips. Other than grooming this is one of the
most trying steps on this fly. Evening long bucktail can test the patience.
3- Once the tips are even, tie in the bucktail at the thread
stopping point. Use as much of the hair length as possible. The length of this
fly is approximately 3.75” from the tip of the hook eye to the tip of the tail.
Lock the bucktail down securely. Bind and trim the hair butts to get as smooth a base as
possible. Though the shank won’t show on the finished fly, any stray hair butts
make the continuous grooming of the sheep hair more difficult than it needs to
be.
4- Cut one bundle from a hank of CCT fibers. Tie it in about
where the bucktail butts were trimmed, then bind it on top of the hook back to
the tail tie-in point. Move the tying thread forward of the hook point to make
room for binding the tail in place.
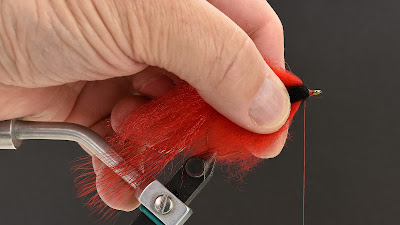
5- Wrap the CCT fibers, loosely onto the tail so the bucktail is
bound in a neat bundle on the bend of the hook. Using the CCT fibers keeps the bucktail from flairing. Wrasp the CCT fiber bundle froward to where the tying thread is hanging and secure it there.
6- Trim the CCT fiber butts and bind them down completely. Then using a thick UV resin formula create a "collar" around the rear of the CCT fiber wrap, letting the resin run, ever so slightly, onto the bucktail. This will keep the bucktail from going crazy during the rest of the tying steps. You'll thank me later for this little trick.
7- Cut a bundle of the Icelandic sheep fur, as close as possible to the hide for maximum length. Then separate out the
course, extremely long hair from the shorter, more delicate underfur. We won’t
use the long hair but don’t throw it out! This stuff is great for brushes and
dubbing loops for collars and spiky bodies on patterns like leeches. You can use it to tie extra long flies but be forewarned, it tangles badly when it's wet. Separate
the underfur into sparse bundles.
8- Starting at the point where the CCT fibers and bucktail butts are bound, tie in a bundle of underfur by
making a single, very loose wrap of thread around the hook and fur. As the
thread comes around on the second turn pull it upward, which will spin the hair
around the hook shank. You’re looking for something similar to spinning deer
hair.
Make about 6 very tight thread wraps locking the underfur in place.
Using a small comb (I use an eyebrow comb) and bodkin, tease out the fur
behind the thread wraps. This will remove any loose hair fur and start getting
it aligned.
9- Work the thread through the underfur on the front side of
the thread wraps, then fold the underfur back. Make a series of thread wraps in
front of the folded underfur to build a small thread dam. Using your comb tease and groom the second layer of underfur
back around the tail. The underfur will be excessively long at this point,
we’ll address that later.
10- Move the thread forward about 1/4" and repeat steps
8 and 9. Tie-in, groom, fold and groom with successive bundles.
11- Add 2 more underfur bundles. This should bring the body to a
point 1/4” behind the hook eye. This is where the serious body grooming takes
place. Whip finish and cut the thread so the fly can be removed from the vise.
**The tricky part of building the body is to get it thick and dense enough without going too far overboard. There are techniques that can be used to trim it down but they are very time consuming and can take the whole project right down the tubes with one wrong cut.**
12- Using a bodkin, comb and/or stiff nylon brush groom all the
underfur straight out from the hook shank. Make sure all loose fur is removed
and all the fibers are radiating straight out from the hook shank. This aligns
all the underfur so it will lay properly for trimming.
13- Starting at the back of the underfur groom the fibers straight back along the hook shank, while keeping them in alignment with the hook shank. This is a slow and tedious process.
14- Groom and slick the fur until all the fibers are in place forming the body which should be bullet shaped. Once the proper shape is attained trim the fur to length by pinching the ends from the fur. Doing this instead of using scissors makes a more natural looking silhouette giving the soft appearance of feathers.
15- Once the desired body shape is achieved, cut 2 bundles from a the hank of CCT fiber.
16- Using a stiff toothbrush groom the CCT fibers until they are in a thin, wide ribbon of individual fibers.
17- Cut the CCT fibers, roughly in half and tie them in as separate bundles on either side of the top of the hook shank at the 10 and 2 o'clock positions.
18- Groom the wings up and back along either side of the top of the body. The wings are long at this point but will be trimmed later in the tying process.
19- Cut a sparse bundle of underfur in half along its length, then tie it in with the cut end toward the back of the fly, using the process described in step 8 & 9.
20- Groom this bundle of underfur back to cover the wing tie-in point and mimic the feathers on the shoulder of a live cardinal in a sitting position.
21- Tie in another bundle of underfur on top of the hook. groom out the fur behind the tie-in point and groom the fibers in front of the tie-in point straight up but DO NOT blend them with the fur to the rear.
22- Take a few wraps of tying thread just in front of the lifted fur, without building a large thread bump.
23- Tie in another sparse bundle of underfur on the bottom side of the hook. Groom the rear fibers into the breast of breast area.
24- Lift the fur forward of the last tie-in point, up and around the hook eye, blending it into the first bundle forming the crown of the cardinal's head. This is finally starting to look a bit like the finished product.
25- Tease the crown back onto the back of the fly without blending it into the body, then build a slight thread bump to hold the crown back.
26- Using your fingertips groom out a small bundle of black dyed rabbit fur, with guard hairs, so that the individual hairs are aligned perpendicular to one another. This takes a bit of time and can by slowly pulling on the tips, stacking the separated hairs and repeating a few times. It's a tricky technique but comes easily with a bit of practice.
Once you have the hairs aligned, tie them in by the middle, on the backside of the hook, immediately in front of the red fur. Use only 1 or 2 thread wraps to avoid building bulk.
27- Repeat the previous step on the front side of the hook.
28- Stroke the rabbit fur to the rear of the fly so all the hairs are pointed back ward along what will be the cheeks, then build a slight thread dam to hold the hair back.
29- groom the rabbit fur back to form the "mask" that is so prominent on the male cardinal. Then build the beak to a slightly smaller size than you want the finished beak to be. The beak will be finished with UV resin later on.
30- After the thread layer of the beak is complete whip-finish and cut the tying thread. Then separate out all the components that make this fly a bird; wings, body, crown. Groom the wings out from the body and trim them to length at an angle.
***Cut the wings long to avoid cutting them too short on the first clip. You can easily trim them as many times as needed but replacing them requires some serious disassembly at this point.
31- Groom the wings into place and tease the crown upward.
32- With the crown tease and groomed up and back, very carefully build and cure the beak with UV resin, starting at the beak/head junction. This will bind the fur back away from the beak somewhat. Keep rotating the fly and adding small amounts of UV resin, adding and curing the resin until the desired size and shape is achieved.
33- I'm using 3.5mm, gold epoxy eyes on this fly. My preferred method of attachment is with Gorilla Super Glue Gel. It binds securely to the fur with enough bulk to hold them in place under pressure. Tweezers with rounded and grooved ends are a big help in this process.
34- Eye placement is critical to the overall look of the finished fly. For this reason use the least amount of super glue necessary to hold the eyes in place. If you do need to move the eye after it's affixed lift it off from front to back to avoid displacing the black mask.
35- Groom, then trim the crown in stages to avoid getting it too short. View the fly from several angles through the trimming process.
Once the crown is trimmed to length, tease it out to soften the edges, groom it out and voila!
There you have it!
Enjoy.
If you have any special requests or would just like to see some J Wood patterns for fishing, check out my website at jwoodflyfish.com
Peace, Love & Fly Fishing!!


No comments:
Post a Comment